
So when we purchased our van it was completely running off 240v, or so we were told. The previous owners had dragged around a generator to run their lights and TV. This seemed a bit crazy and so I set about trying to set it up for free camping. The first step was to lower the usage of the current electrical components. Quick summary of converting the light to LED can be found here: http://thelapyear.com/2017/08/19/working-with-strippers/
Step two was to convert the existing “240v” system to 12v. I was a bit suprised to find that the lights, range-hood, TV booster antenna etc were all 12v – particularly when I’d been told the van was all 240v. The next thing i found was an unusual electrical box found in the bedroom. This turned out to be a 240v to 12v power supply. After some quick testing (unplugging it) I found that basically the whole van ran off this. This was good news as now I knew I just had to wire my 12v system to this. So I mounted the 120AH battery in the front boot – ideally this would be positioned as close to the axles as possible to centralize the heavy weight. I then ran 8B&S cable with a 40amp fuse at the battery end through to the power supply and put a 50amp anderson plug on both the power supply and the battery supply this way I can swap between the two if required.
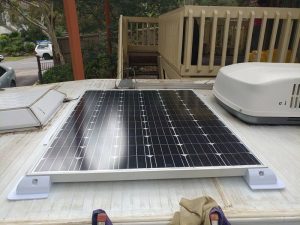
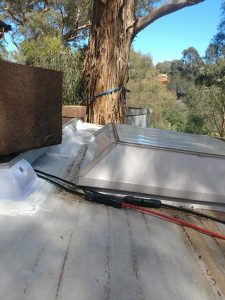
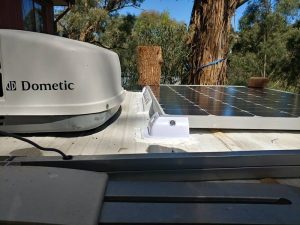
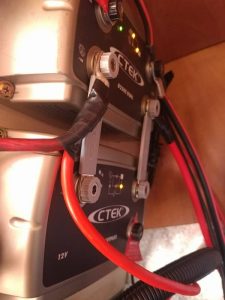
Next step was to mount the solar panel. I’d measured it up so I knew it would fit well. It wasn’t close to the front of the van (which some had said is a no-no) and it was a nice flat surface. The trickiest bit was actually getting the panel on the roof as it was physically big and quite heavy. After I’d positioned it where I wanted it – I marked around the mounting feet with a pencil and removed the panel again. I then gave the roof a thorough clean with soapy water and once dry again with acetone. I then used Sikaflex to glue the panel onto the roof of the van. I then ran UV resistant wires through a gland in the roof and down the cupboard next to the bed and into the CTEK controller. I could have used the solar controller which came with the panel and I probably would have if I didn’t have the CTEK already. I’ve added a few extra anderson plugs around the CTEK to allow me to plug in my 2nd portable solar panel and also to allow me to run a charging station in the front boot (I’ll document that one when I finish it).
A few pics below showing the sikaflex drying and the CTEK charging.
Price list for this conversion (~$540+CTEK)
- AGM Battery (120AH) – $220
- Solar Panel – 250w (with ebay 20% off): $194.40
- Mounting Hardware – $43
- Stainless bolts/nuts/washers – $25
- Wire with MC4 Connectors – $32.90
- Sikaflex 11fc – $19
- CTEK d250s & CTEK smartpass – I already had this but they would set you back about $250 each
Keep in mind this is for a van with a 3 way fridge (12v, 240v and gas) if you have a 2 way fridge then 12v requirements increase and you would need more AH in your battery bank as well as more solar.
Hey Lap Year
just wondering what voltage your solar puts out only because my 250w panel put out 35v and the ctekd250 max input is 22v
Cheers
Safe travels
Hi John,
my 250w panel is 21.42v open circuit and maximum power voltage of 17.46v. I’ve had it running for a few months now without an issue. Maybe yours is a house style one? Or one made for a 24v system. Did you have to go with another regulator to get it to work?
Cheers,
Lap Year